Financial Statements
EPASS has a very powerful built in script language that allows you to design financial statements to accumulate and print whatever you require. Departmentalized financial statements or working papers can be easily created for any division of the company.
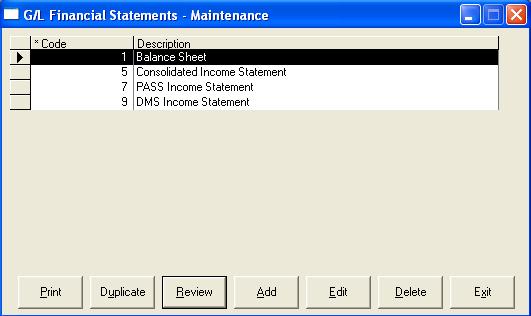
All actions, with exception of Add and Exit, are only activated once a financial statement has been selected.
Print: This will print the financial statement format or script language; it does not print the financial statement.
Duplicate: If you are creating a new financial statement, it may be easier to duplicate an existing financial rather than starting from scratch.
Review: This will review the selected financial statement. This allows you to review the financial statement format.
Add: This will add a new financial statement.
Edit: This will edit the selected financial statement.
Delete: This will delete the selected financial statement.
ADD
Add will create a new financial statement for you to start entering in the detail lines. Each detail line becomes part of the financial statement format or design.

EPASS will keep you in Add mode until you click Cancel, then you will have the new options add, edit, delete, and exit. These new buttons allow you to edit and maintain the detail of the financial statement format.
Understanding Accumulators
The calculation of amounts in financial statements uses 9 accumulators, named numerically. Think of it like a spreadsheet with nine columns. As a GL account is selected, its current and YTD amounts are added into ALL of the accumulators. The individual accumulators may be cleared at any time with a command that clears accumulator 'X' and all accumulators less than 'X'. For instance, if we clear accumulator 5, accumulators 1, 2, 3, 4, and 5 will be cleared automatically, but accumulators 6 through 9 still hold the running balance.
By using the low number accumulators for the lowest totals and the high number accumulators for the final totals, the totalling system provides a great deal of flexibility.
Recommended Accumulator Usage
1 lowest level of totalling
2
3 sub totals (e.g. revenue or expenses)
4
5 grand totals
6
7
8
9
Select Command
There are a total of thirteen different commands that can be used to make up a financial statement.
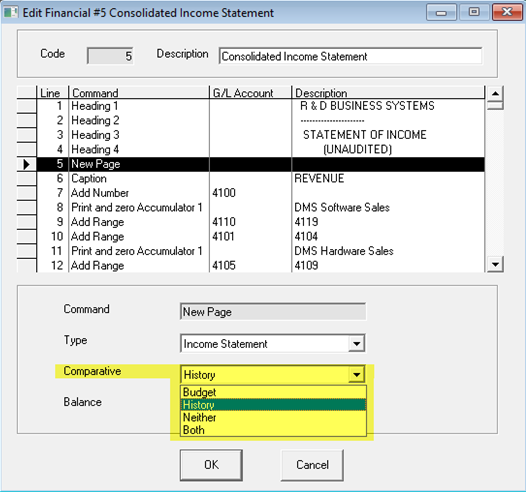
1. New Page: This defines the statement type and is mandatory
- Type: Is this an income statement or balance sheet?
- Comparative: With history, budget or neither (no comparatives).
- Balance: You can select 'Current and YTD' or 'Year To Date' only. Most income statements use current and YTD whereas balance sheets normally show only the YTD.
2. Heading: Allows you to print headings on the statement
- Heading Number: 1 through 4. You can have a maximum of 4 heading lines. These are used for company name and a title.
- Description: The heading you want to print.
- Print Bold: Do you want this in bold font?
3. Heading Date: A special type of heading line that will print the period date.
- Description: If you leave this blank, the system will print 'For the period ending' and the fiscal period end date. If you fill this in, EPASS will print your description followed by the fiscal period end date.
- Print Bold: Do you want this in bold font?
4. Caption: A comment or title line
- Description: Leaving the description blank will print a blank line.
- Print Bold: Do you want this in bold font?
5. Add Number: Add the totals from one GL account into all accumulators. This command does not print, it only accumulates totals. Add number is commonly used when you cannot accumulate a range of GL accounts, possibly because the chart of accounts is not organized the same way you want your financial to print. This allows you to select one at a time.
- G/L Account: Any active GL account can be selected.
6. Add Range: Add the totals for a range of GL accounts into all accumulators. This command does not print, it only accumulates totals.
- G/L Account From: Any active GL account can be selected.
- G/L Account To: Any active GL account can be selected.
7. Add and Print: Add the totals from one GL account and print it. This command accumulates totals and also prints.
- G/L Account: Any active GL account can be selected.
- Description: Leaving the description blank will print the description of the GL account selected as shown in the GL master file.
- Print - Always: The selected GL account will always
be printed no matter what the total is.
- Only if Not Zero: The selected GL account will only print if the total current or YTD is not zero. In other words the account has activity.
- Only if Positive: The selected GL account will only print if the total current or YTD is a positive value.
- Only if Negative: The selected GL account will only print if the total current or YTD is a negative value.
- Level: The level allows you to set focus to a line on the printout by filling in asterisks or similar attention getting characters. It is common to use one asterisk for a group total and two or three asterisks for a higher level total and possibly four or five asterisks for the grand total or total profit line.
- Reverse Sign: Some people would rather see positive values for revenue/profit even though revenue/profit are truly negative values in the GL. The reverse sign option will print the amount with the sign reversed but it does not affect the accumulators. The accumulators will always accumulate the true value of each GL account.
8. Subtract and Print: Subtract the totals from one GL account and print it. This command is the exact opposite of Add and Print and is not commonly used. It also accumulates totals and prints.
- G/L Account: Any active GL account can be selected.
- Description: Leaving the description blank will print the description of the GL account selected as shown in the GL master file.
- Print - Always: The selected
GL account will always be printed no matter what the total is.
- Only if Not Zero: The selected GL account will only print if the total current or YTD is not zero. In other words the account has activity.
- Only if Positive: The selected GL account will only print if the total current or YTD is a positive value.
- Only if Negative: The selected GL account will only print if the total current or YTD is a negative value.
- Level: The level allows you to set focus to a line on the printout by filling in asterisks or similar attention getting characters. It is common to use one asterisk for a group total and two or three asterisks for a higher level total and possibly four or five asterisks for the grand total or total profit line.
- Reverse Sign: Some people would rather see positive values for revenue/profit even though revenue/profit are truly negative values in the GL. The reverse sign option will print the amount with the sign reversed but it does not affect the accumulators. The accumulators will always accumulate the true value of each GL account.
9. Print Range: Print all the GL accounts within a range. This command both accumulates and prints the selected GL accounts using the description from the GL master file.
- G/L Account From: Any active GL account can be selected.
- G/L Account To: Any active GL account can be selected.
10. Profit & Loss: A special function on the balance sheet to calculate the current year earnings. It accumulates all GL accounts after the GL variables End of Balance Sheet value to calculate the current year earnings. There are no options on the command. This command only accumulates, it does not print.
11. Print Accumulator: Print the total of the accumulator selected.
- Accumulator Number: 1 through 9. Select the accumulator to print.
- Description: What title do you want printed beside the sub-total? The description is mandatory.
- Print - Always: The selected
accumulator will always be printed no matter what the total is.
- Only if Not Zero: The selected accumulator will only print if the total is not zero. In other words the account has activity.
- Only if Positive: The selected accumulator will only print if the total is a positive value.
- Only if Negative: The selected accumulator will only print if the total is a negative value.
- Level: The level allows you to set focus to a line on the printout by filling in asterisks or similar attention getting characters. It is common to use one asterisk for a group total and two or three asterisks for a higher level total and possibly four or five asterisks for the grand total or total profit line.
- Reverse Sign: Some people would rather see positive values for revenue/profit even though revenue/profit are truly negative values in the GL. The reverse sign option will print the amount with the sign reversed but it does not affect the accumulators. The accumulators will always accumulate the true value of each GL account.
12. Zero Accumulator: Zero the total of the accumulator selected. If you do an Add and Print followed by an Add Range, you would need to Zero Accumulator prior to the Add Range or else the accumulator already has the values from the previous Add and Print command and will print misleading totals on your next Print Accumulator.
13. Print and Zero Accumulator: Print the accumulator selected and also zero it out.
- Accumulator Number: 1 through 9. Select the accumulator to print and zero out.
- Description: What title do you want printed beside the sub-total? The description is mandatory.
- Print - Always: The selected
accumulator will always be printed no matter what the total is.
- Only if Not Zero: The selected accumulator will only print if the total is not zero. In other words the account has activity.
- Only if Positive: The selected accumulator will only print if the total is a positive value.
- Only if Negative: The selected accumulator will only print if the total is a negative value.
- Level: The level allows you to set focus to a line on the printout by filling in asterisks or similar attention getting characters. It is common to use one asterisk for a group total and two or three asterisks for a higher level total and possibly four or five asterisks for the grand total or total profit line.
- Reverse Sign: Some people would rather see positive values for revenue/profit even though revenue/profit are truly negative values in the GL. The reverse sign option will print the amount with the sign reversed but it does not affect the accumulators. The accumulators will always accumulate the true value of each GL account.


Both of the highlighted options allow you to represent the totals as a percentage.
% of Total is used on the group totals (Total Revenue, Total COGS, Total Expenses) and will show what percentage each sub-total (Print and Zero) is compared to its respective total. I.E. you want to see what percentage each section of the business is in comparison to total revenue or what percentage of total expenses each expense is.
To use this, you enable % of Total on the larger Print and Zero Accumulator lines and the smaller Print and Zero Accumulator lines above it will be shown as a percentage of that total.
Base all % on this Total expands the above option so that all totals, including expenses etc., will be shown as a percentage of a specific total. You may still be using Total Revenue as your base number but, now all totals (Revenue, COGS and Expenses) will be compared to that one total.
Comparative
Comparative supports comparing to both budget and history. When selecting both, there will be new columns on both the printout and the Excel output so you can have all this on one report.
Duplicate
Select the financial statement you wish to duplicate and click duplicate. Sometimes it is easier to duplicate an existing financial statement and edit rather than create a new one from scratch.
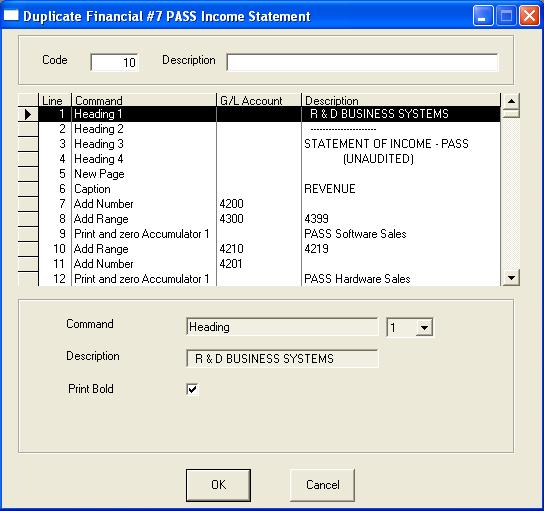
Description: This is the name you are giving to the new financial statement. Nothing else can be modified at this time.
Prepare Financials
Prior to printing financial statements, the data must be prepared. Financials can be run for any period including the next fiscal year. It is quite common, at year end, to wait a few months before the final year end adjusting entries are received and the year can be closed. In the meantime, you can select to run the financial statements for periods in the future with the understanding that some balance sheet accounts will be affected by the year end closing.
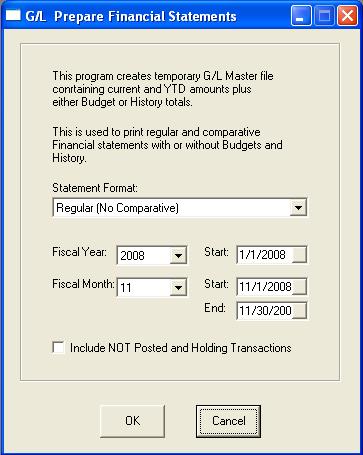
Statement Format - Regular (No Comparative): The data will be calculated only looking at the transactions for the specified financial period. No comparative data will be calculated.
Comparative with Budget: The data will be calculated looking at the transactions for the specified period along with budget details setup through Budget Maintenance.
Comparative with History: The data will be calculated looking at the transactions for the specified period along with the previous years transaction for historical comparisons.
When Comparative is selected, preparing the financial statements will accumulate the numbers for both budgets and history; the printing routine will allow you to select what to compare to.
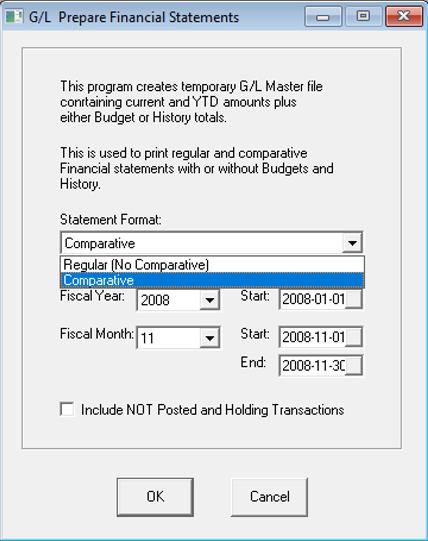
Fiscal Year: The current fiscal year will be defaulted. You can select any past year including next year.
Start: The start date of the fiscal year will be defaulted. It is NOT recommended to override the start date of the fiscal year or the beginning balances may not be calculated properly.
Fiscal Month: The current fiscal month will be defaulted.
Start: The start date of the fiscal month selected will be defaulted. You should not override this date unless you want a specific date range such as a portion of the month.
End: The end date of the fiscal month selected will be defaulted. You should not override this date unless you want a specific date range such as a portion of the month.
Include NOT Posted Transactions and Holding File: When selecting a future period, this is automatically selected. You will want to select this option if you have not posted the GL transactions yet and would like them included in the report.
Print Financials
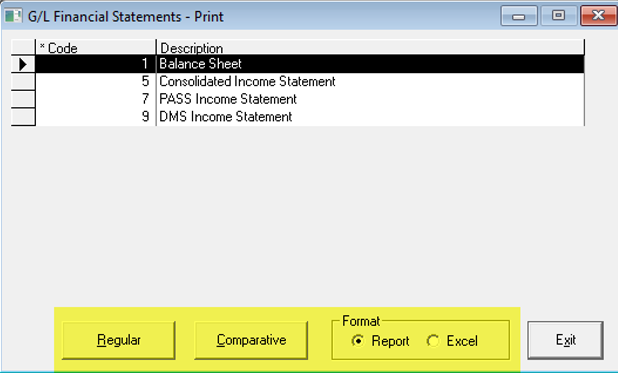
Financial statement printing allows printing both as a report and exporting to Excel.
Comparative: This will print a Comparative Financial statement. The comparison will be based on both how the 'Comparative' option within the 'New Page' command is setup along with how Prepare Financials was run. Both must match for the financial to print properly; if the New Page command has 'History' selected for the Comparative option, Prepare Financials must also be run with the 'History' option selected.
If you have selected to compare to Both (Budget and History), the cents are removed from the report.
